

How to Re-Caulk Windows: A Step-by-Step Spring Refresh for Indianapolis Homeowners
Failing window caulk is one of the most common causes of drafts, moisture damage, and rising energy bills in American homes. Knowing how to re-caulk windows correctly, using the right materials and technique, can seal air leaks, protect your framing, and keep your home comfortable through every season.

Key Takeaways
- Inspect your window caulk at least once a year and plan to replace it every three to five years, or sooner if you notice cracks, peeling, or drafts.
- Spring is the ideal season to re-caulk in Indianapolis because moderate temperatures help caulk cure properly without cracking.
- Removing old caulk completely before applying a new bead is essential for a lasting, watertight seal.
- Silicone-based caulk is best for exterior window joints; latex or paintable acrylic caulk works better for interior applications.
- Proper surface prep, including cleaning and drying the joint, is just as important as the application technique itself.
- According to a 2026 survey by This Old House, nearly 90% of homeowners reported lower monthly energy bills after sealing and upgrading their windows, with $25 to $49 per month being the most common savings range.
Why Your Window Caulk Fails and When to Replace It
Window caulk is not a permanent fix. It expands and contracts with temperature swings, absorbs UV radiation, and gets battered by rain, wind, and humidity. Over time, even the best-quality caulk becomes brittle, pulls away from the frame, or develops hairline cracks that let air and moisture sneak through.
According to This Old House (2026), homeowners should inspect their windows annually and recaulk every three to five years, or whenever visible cracks, drafts, or increased energy bills signal deterioration. In a city like Indianapolis, where winters can drive temperatures well below freezing and humid summers follow closely behind, that deterioration cycle tends to run on the faster end.
Here are the warning signs that tell you it is time to act:
- Caulk that is cracked, crumbling, or pulling away from the frame
- Visible gaps between the window frame and the surrounding wall
- Drafts you can feel with your hand near the window edge
- Condensation forming on the interior glass during cold months
- Paint peeling near window frames, which often signals moisture infiltration
Spring is the ideal time to tackle this project in Indianapolis. Temperatures between 50°F and 80°F allow caulk to flow smoothly from the tube and cure without contracting prematurely. If you apply caulk in winter when it is below 40°F, the product may not adhere properly, and if you apply it in peak summer heat above 90°F, it can skin over too quickly and trap air bubbles.
Use the indianapolis spring window inspection checklist each year as a structured way to catch caulk failures, frame damage, and hardware issues before they become expensive repairs.
What You Will Need Before You Start
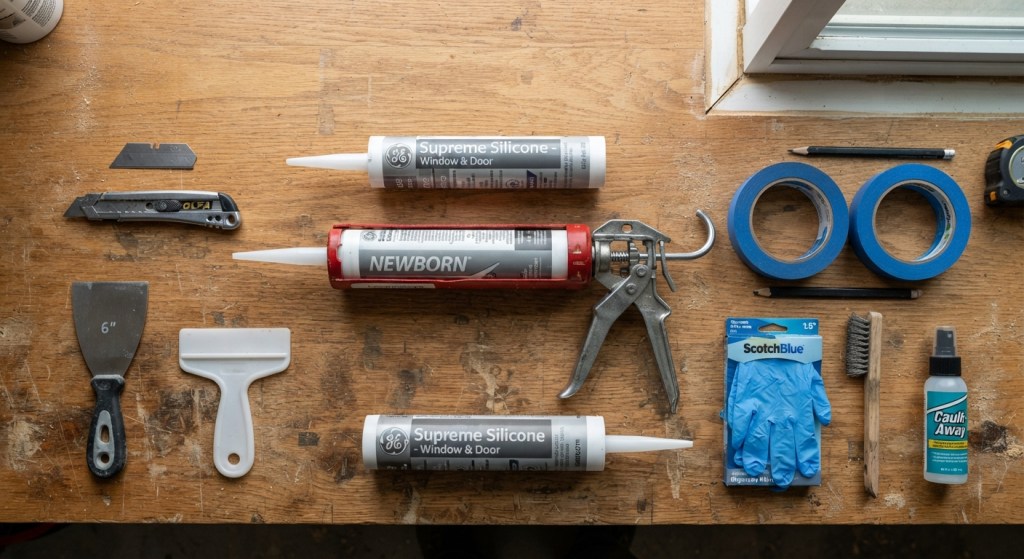
Gathering everything before you begin saves time and prevents the frustration of stopping mid-job to run to the hardware store. Here is a full list of materials and tools:
Materials:
- Exterior-grade silicone or siliconized-latex caulk (for outdoor joints)
- Paintable acrylic latex caulk (for interior trim joints)
- Caulk gun
- Mineral spirits or isopropyl alcohol (for cleanup)
- Painter’s tape
Tools:
- Utility knife or oscillating multi-tool
- Plastic scraper or stiff putty knife
- Wire brush
- Clean rags or paper towels
- Caulk finishing tool or wet finger
Choosing the Right Caulk
| Caulk Type | Best Use | Paintable | Flexibility | Cost (avg.) |
|---|---|---|---|---|
| Silicone | Exterior joints, wet areas | No (most) | Very high | $6 to $12 per tube |
| Siliconized Latex | Exterior and interior combo | Yes | High | $5 to $10 per tube |
| Acrylic Latex | Interior trim, painted surfaces | Yes | Medium | $3 to $7 per tube |
| Polyurethane | High-movement joints, exterior | Yes | Very high | $8 to $14 per tube |
According to Angi’s 2026 cost guide for caulking, professional caulking services typically run between $75 and $450 depending on the number of windows, the type of caulk, and your local labor market. Doing it yourself brings that cost down to roughly $15 to $50 in materials for an average home.
The broader market for window and door sealants reflects just how much homeowners invest in this category. The Window and Door Sealant Market was valued at $4.2 billion in 2025 and is estimated to reach $6.8 billion by 2034, exhibiting a CAGR of 5.5% from 2026 to 2034, according to Verified Market Reports (2026). That growth signals rising homeowner awareness about the role sealants play in energy efficiency and moisture control.
How to Re-Caulk Windows: The Step-by-Step Process

This is where the actual work begins. Follow these steps in order for a clean, long-lasting result.
Step 1: Remove the Old Caulk Completely
This is the step most DIYers rush, and it is also the one that determines whether your new caulk holds or fails within a season. Old caulk prevents the fresh material from bonding directly to the frame and wall surface.
Use a utility knife to score along both edges of the existing caulk bead. Then work a plastic scraper or stiff putty knife under the strip and peel it away. An oscillating multi-tool with a scraper blade makes this job significantly faster on longer runs.
After removing the bulk, go over the joint with a wire brush to clear out any remaining fragments. Wipe the surface down with mineral spirits or isopropyl alcohol to eliminate grease, chalking paint, and residue that would interfere with adhesion.
Step 2: Clean and Dry the Surface
Any moisture in the joint will prevent caulk from bonding. After cleaning with a solvent, give the surface at least 30 to 60 minutes to fully dry on a warm day. If you are working after rain, wait 24 hours.
Check that the surrounding paint or primer is in good shape. If paint is peeling back into the joint, scrape it away and spot-prime before caulking.
Step 3: Apply Painter’s Tape for a Clean Line
Painter’s tape on both sides of the joint gives you a professional-looking finish with crisp edges. Press the tape firmly so caulk does not bleed underneath.
Step 4: Load and Cut the Caulk Tube
Cut the tip of the caulk tube at a 45-degree angle. Start with a smaller opening, roughly 3/16 of an inch, for most window frame joints. A smaller bead is easier to control and tool smoothly. Puncture the inner seal with the rod on your caulk gun.
Step 5: Apply the Caulk Bead
Hold the caulk gun at a 45-degree angle and push the caulk into the joint rather than dragging it along the surface. Move at a consistent pace, keeping steady pressure on the trigger. Aim to fill the joint completely in one continuous pass without gaps or bubbles.
For deep gaps larger than 1/4 inch, use foam backer rod to fill the void before caulking. This prevents the caulk from sinking into the gap and creating a weak, thin section.
Step 6: Smooth and Tool the Bead
Within five minutes of application, run a wet finger or a plastic caulk finishing tool along the bead. This pushes the caulk into the joint, removes air pockets, and creates a concave surface that sheds water effectively.
Pull the painter’s tape away immediately after tooling, before the caulk begins to skin over.
Step 7: Allow Full Cure Time
Silicone caulk typically skins over in 30 to 60 minutes but requires 24 hours for a full cure before exposure to rain. Acrylic latex products cure faster but should still be protected from water for at least 12 hours. Check the manufacturer’s label for specific guidance.
Pairing Re-Caulking With Other Window Weatherization Steps
Re-caulking handles the rigid joints between your window frame and the wall, but it does not address the movable parts of the window itself. That is where window weatherstripping comes in, which seals the gaps around operable sashes, including double-hung, casement, and sliding windows, and it needs its own inspection and periodic replacement.
Combining fresh caulk with new weatherstripping covers all the major air leakage points around a window assembly. According to the U.S. Department of Energy, air leaks around windows and doors can account for a significant portion of a home’s total heating and cooling loss, making this combination one of the highest-return weekend projects a homeowner can tackle.
If your windows are older than 15 to 20 years, cracked, warped, or showing signs of frame rot, re-caulking may extend their life by a season or two but is unlikely to solve the underlying problem. The Freedonia Group’s research on the U.S. windows and doors market notes that demand for replacement windows remains strong, driven largely by energy efficiency upgrades in aging housing stock, which describes a significant portion of Indianapolis-area homes.
Common Mistakes That Cause Re-Caulking to Fail Early
Even with the right product and tools, a few avoidable mistakes can shorten the life of your caulk job significantly:
- Skipping the removal step: Caulking over old caulk creates a weak bond and a lumpy finish that traps water.
- Working in cold or wet conditions: Below 40°F or on a damp surface, most caulk products will not cure properly.
- Applying too thin a bead: A skinny bead lacks the body to bridge joint movement and often cracks within months.
- Not pressing the caulk into the joint: Surface application without penetration fails quickly, especially on textured surfaces.
- Painting over silicone: Pure silicone caulk does not accept paint. If your window trim is painted, use siliconized latex instead.
What Professional Re-Caulking Costs in Indianapolis
If you prefer to hire out the work, professional caulking in the Indianapolis area generally falls within the national range reported by Angi: between $75 and $450 per project, depending on the number of windows, accessibility, and the type of product used. Homes with second-story windows requiring ladder work or scaffolding will sit at the higher end of that range.
The window repair services market as a whole is forecasted to grow at a CAGR of 6.5% from 2026 to 2033, reaching $5.5 billion by 2033, according to Verified Market Reports (2025). As of 2026, the U.S. window repair industry is valued at approximately $5 billion, reflecting sustained demand from homeowners prioritizing maintenance over full replacement where possible.
For most Indianapolis homeowners, the DIY route for re-caulking is very manageable. The tools are inexpensive, the materials are widely available at hardware stores, and the skill ceiling is low enough that a first-timer can produce professional-quality results by following the steps above carefully.
Frequently Asked Questions
Q: How often should you re-caulk windows?
Most windows need fresh caulk every three to five years, though harsh climates can shorten that cycle.
In Indianapolis, where temperatures swing from below zero in January to above 90°F in July, the freeze-thaw cycle puts significant stress on caulk joints. Inspect your windows each spring and look for cracking, shrinkage, or peeling. If you notice any of those signs before the three-year mark, do not wait. Re-caulking early is far cheaper than repairing water-damaged framing later.
Q: What is the best type of caulk to use for exterior windows?
Silicone or siliconized latex caulk is the best choice for exterior window joints because of its flexibility and water resistance.
Pure silicone holds up exceptionally well against UV exposure, temperature swings, and moisture, making it ideal for the outside of your home. The trade-off is that it cannot be painted, so if your window trim is a specific color, siliconized latex gives you the same durability with the added benefit of accepting paint. Avoid standard acrylic latex on exterior joints, as it tends to crack and shrink faster when exposed to the elements.
Q: Can you caulk over old caulk without removing it first?
No, applying new caulk directly over old caulk almost always leads to early failure and a poor-looking finish.
Fresh caulk needs to bond directly to clean, dry substrate, whether that is wood, vinyl, aluminum, or masonry. Old caulk, especially if it is cracked or partially detached, does not provide a stable bonding surface. The new material will follow the same failure pattern as the old layer underneath it, often within a single season. Taking the time to remove the old caulk completely is the single most important step in getting a long-lasting result.
Q: How long does window caulk take to dry before it can get wet?
Most exterior caulks are rain-safe within 24 hours, but the exact timeline depends on the product type and temperature.
Silicone caulk typically skins over within 30 to 60 minutes and reaches a rain-safe cure in 24 hours under normal conditions, around 70°F with moderate humidity. Acrylic latex caulk can be touch-dry in as little as one hour but still benefits from staying dry for at least 12 hours. Cold temperatures and high humidity slow curing significantly. Always check the manufacturer’s label for the specific product you are using, and plan your project around a dry weather window of at least one full day.
Q: Is re-caulking windows something a beginner can do, or should you hire a professional?
Re-caulking windows is one of the most beginner-friendly home maintenance tasks available, and most homeowners can complete it successfully with basic tools.
The job requires no special licenses, no power tools beyond an optional oscillating multi-tool for removal, and no advanced construction knowledge. A caulk gun costs less than $15, and a full set of materials for an average home runs between $15 and $50. The steps are straightforward, the risk of making things worse is low, and the payoff in comfort and energy savings is immediate. Hiring a professional makes more sense when windows are on upper floors requiring ladder work, when the surrounding framing shows signs of rot or structural damage, or when you simply prefer a guaranteed finish.
The Bottom Line on How to Re-Caulk Windows
Understanding how to re-caulk windows is one of the highest-return maintenance skills any homeowner can develop. The process is straightforward, the materials are inexpensive, and the benefits, from lower energy bills to better moisture protection and a more comfortable interior, show up quickly and last for years when the job is done right. Whether you are maintaining a newer home or keeping an older Indianapolis property in good shape, fresh caulk applied correctly each spring gives your windows the best chance of performing at full efficiency through every season.
Your next step is simple: walk the perimeter of your home this week and run your hand along each window frame. If you feel a draft, see cracking, or notice any gaps between the caulk and the frame, add that window to your project list. Pair the re-caulking work with a weatherstripping inspection and a broader spring window check, and you will have covered every major air leakage point in one focused afternoon.